Azuarc's Leveling Guide part 15
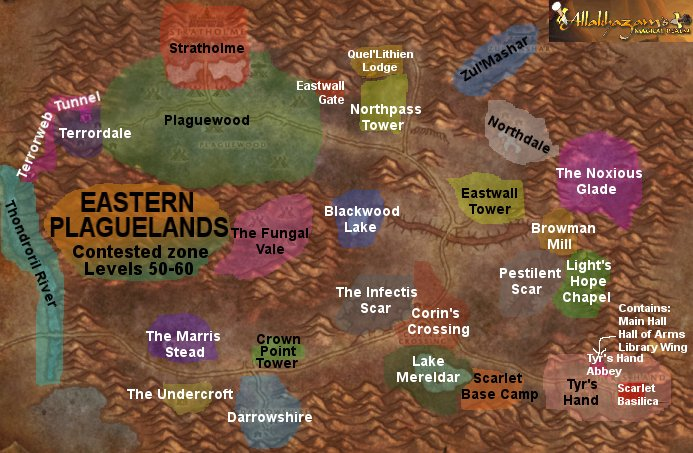
Azuarc's leveling guide for Alliance, Act 15: Plaguelands (55-58)
The Header for the Top
We have just a few more levels to go before Outland, and quite a bit of material remaining, which means we can afford to start being picky. Some would argue that you can cut to Outland the second you hit level 58, which is where this act should hopefully find you. My stance is that we should at least be well into level 59, (especially without any gear from instance-running,) so there will be an additional act in the Old World following the Plaguelands, but we are not going to do every quest in the Plaguelands, and we are not going to do every quest in Burning Steppes and Winterspring, and the closest we will come to Silithus is the western pylon in Un'goro.
Each of the scenes in this act are going to be very involved. Take breaks as necessary.
Scene 1 - Dalson's Tears (level 55)
Quests completed: Good Luck Charm, Two Halves Become One, Mrs. Dalson's Diary, Locked Away 1-2, Target: Dalson's Tears, Dalson's Tears Cauldron, Return to Chillwind Camp 2
The only quest from outside the Plaguelands you should have is Good Luck Charm. The rest, if you dropped them, should be re-attainable at Chillwind. Grab everything here that's available except the Scholomance quest.

Cross Andorhol, and find your way back to Felstone Field. This area was rather challenging the last time we were here, but that should be rather different now. Sneak your way into the farmhouse, and then talk to Janice Felstone. Her husband, who holds the other half, is the Jabbering Ghoul out in the field. He's the one with a pitchfork. Loot him and return to her.
Head east to Dalson's Tears for cauldron #2. As with the first cauldron, the key is to gain physical access to it, spawn the cauldron lord if necessary, and then kill the cauldron lord for the key. Each of the farms has a side-quest, however. You just finished the one at Felstone Field. The one at Dalson's Tears doesn't leave the area, but it's a bit more convoluted.
Get into the barn. On the ground will be a journal. Reading it won't give you a real quest, just let you complete one you never had. This is a little odd, but it's a prerequisite for the real quest. If you read the journal, you'd understand what's going on here. Mrs. Dalson herself is the "Wandering Skeleton" that is in the area. Keep a close eye out for this target because the Scarlets in the area like to kill her if she gets too near. The skeleton patrols both in front of and behind the buildings.
If you loot the skeleton, you will get the outhouse key. Behind the two buildings is the outhouse, where Farmer Dalson is locked up. Open the outhouse and put him to rest. On HIS body is the key to unlock the cabinet in the farmhouse. Work your way into the farmhouse and you will be able to claim the family's old treasures that they won't have any use for any longer.
At this point you can return to Chillwind Camp.
Scene 2 - The Big Grind (level 55/56)
Quests completed: Target: Writhing Haunt, Writhing Haunt Cauldron, Blood Tinged Skies, Carrion Grubbage, Little Pamela, Pamela's Doll, Uncle Carlin, Duke Nicholas Zverenhoff
Flight points acquired: Light's Hope Chapel (Eastern Plaguelands)
This scene is going to see you finish the third cauldron quest, head into Eastern Plaguelands, and gradually work your way to the quest hub at the far end of the zone while killing lots of stuff along the way. Hence, The Big Grind.
Cross the stream by Sorrow Hill and head to the Writhing Haunt. The mobs here are far more annoying than before, so take your time. Clear to the cauldron as before, and then try to get into the small house to the northeast where Mulgris Deepriver lies. Take his quest and continue up to the road in the north, and follow it east out of the zone.
As soon as you are able to after entering Eastern Plaguelands, turn west off the road and follow the Thondroril River north. You should arrive at the home of Tirion Fordring, who has THREE quests for you. These quests are also going to take a good bit of work because he wants you to essentially kill every grub, every bat, and every hound you encounter. So this is precisely what you will do as you travel through the zone. Don't avoid anything except maybe gargoyles. This will take a while, but you need to finish these quests by the time you would naturally return to him, which is basically one circuit around the zone, so get as much as you can during this scene. (You will not encounter the other two types of Plaguehounds in the southwestern quarter of the zone.)
Along your grind-filled journey, return to the road, travel along it, and find the targets you find along the south side of the road. When you reach Crown Point Tower, follow the southern path into Darrowshire. Behind the inn is a small house where Pamela Redpath is. She will want you to find her doll, which is in three pieces in the ghost town. Each time you approach one of the pieces on the ground, a ghost will spawn that you will need to dispatch. This quest used to be VERY hard, but it's completely straightforward now. Combine the three doll pieces and take them to Pamela. She'll ask you to look for her aunt and her uncle. We'll find the uncle first.
Leave Darrowshire and continue east. Stay south of the road so you can avoid Corin's Crossing. Nobody ever has any business in that place. If you continue to the east edge of the zone, behind the Pestilent Scar, you will reach Light's Hope Chapel. There are a TON of quests in Light's Hope Chapel, but you do not want to grab them all. In fact, the only quest you should bother with (after turning in completions) is Zaeldarr the Outcast. You can grab Defenders of Darrowshire if you really want to, but chances are it will be an exercise in frustration.
Set your hearthstone.
Quest Log Check
- Morrowgrain Research (Darnassus)
- Auntie Marlene (EPL)
- Blood Tinged Skies (EPL, mostly complete)
- Carrion Grubbage (EPL, mostly complete)
- Demon Dogs (EPL, largely complete)
- Zaeldarr the Outcast (EPL)
- Find Ranshalla (Rut'theran Village)
- Calm Before the Storm (Tanaris)
- Winterfall Activity (Timbermaw Hold)
- The Wildlife Suffers Too (WPL)
- A Plague Upon Thee (WPL)
- Return to Chillwind Camp (WPL)
- All Along the Watchtowers (WPL)
- The Mark of the Lightbringer (WPL)
- Troubled Spirits of Kel'theril (awaiting completion)
- Winterfall Ritual Totem (Winterspring)
- Winterfall Runners (Winterspring)
- Enraged Wildkin (Winterspring)
Scene 3 - Dig (level 56)
Quests completed: A Plague Upon Thee, Demon Dogs, Of Forgotten Memories, Zaeldarr the Outcast
Start off northwest, looking mostly for plaguehounds. The bats in the area don't count, but the grubs do. However, your destination is Plaguewood.
Plaguewood is not an especially fun area. Your goal is simple: get in, get some termites, and get out. Some of the mobs here range as high as level 58, so you want to be brief. The termite colonies are tan cylinders about as tall as a Tauren, and tend to be next to the tall tree-mushroom things. You'll probably have to find about 6 colonies.
Leave Plaguewood the way to came in, but stay to the west. The zone is a big backwards C, and you're going to stay to the northern side of the lower cusp. Be sure to find your 5 Frenzied Plaguehounds before you leave the northern half, and get 5 normal Plaguehounds before progressing past The Infectis Scar and Corin's Crossing. You're going back to Tirion Fordring, and you will have all three quests complete by the time you make it to him.
With all three complete, you'll get a follow-up that leads to the Undercroft. You have a quest there already. So head south and a little east to the old crypt. The mosshide trolls outside are no big deal. Inside the tomb, you'll find Zaeldarr. There's nothing hard about fighting him, just be wary of the first pull in the tomb. Also on the floor, you will find the quest starter for Hameya's Plea. Might as well grab it.
No, the hard part comes outside the tomb. Behind the entrance is the grave you need to search. There's some loose dirt there, and as soon as you click on it, a team of grave robbers will approach and attack you. This is NOT a fight you want to perform solo. If you absolutely must, focus on the named guy, Mercutio Filthgorger, and understand that you ARE going to die. It's still not a pretty fight with a partner since there are four of them. Loot Mercutio and return to Tirion.
Hearth back to LHC, and then fly to Chillwind.
Scene 4 - Alas, Poor Andorhol, I Knew Him Well (level 56)
Quests completed: Auntie Marlene, A Strange Historian, A Matter of Time, Counting Out Time, The Annals of Darrowshire, All Along the Watchtowers
Complete the third cauldron quest and grab the fourth. We will finish the cauldron eventually, but not yet.
Start off by heading into Sorrow Hill to talk to Marlene Redpath. She will ask you to check her brother's grave outside and take the wedding ring from it to a gnome in Andorhol named Chromie. Andorhol will be the focus of the first leg of our journey.
Take the bridge over the river and into town. There will be a guard tower nearby. Fight your way to the doorway and use your beacon torch. You do not need to kill the mob inside. From there, get to the west end of town. You can either fight your way across or you can ride back out and take the road by Chillwind Camp. Either way, find your way to the guard tower at the other entrance to town and put that to the torch as well.
Just up the path from the western guard tower is a ramshackle inn. Head inside. You will find Chromie in the master suite upstairs. She will continue the Redpath storyline and also give you a task of her own. Leave the inn and head toward the northern entrance to town. The other two guard towers are both there. Near each tower will be some silos with glowing flashing beams of light coming out of them. Use your Temporal Displacer to summon some time worms. Be aware that as you kill one of these grubs, another is likely to spawn, so getting 10 killed really only requires you to go through this process maybe twice. But be prepared for a long fight.
After killing all 10 temporal parasites and torching the fourth tower, head southeast. The town's central square, where Araj the Summoner is proudly surrounded by a ton of undead, also hosts the Town Hall. With a careful approach, you can enter the town hall without aggroing any of the large groups outside. Inside, check the books for The Annals of Darrowshire. There used to be a visible way to tell which book was the annals, but Blizzard has nixed that. Instead, you'll just have to open books until you get it. Each time you are wrong, you will fight a battle that does nothing but eat up time. Not even any experience!
Sneak back out of the town hall and return to Chromie. She'll have one more task for you. In nearly every one of the beat-up ruined buildings is what looks like a toolbox. You need to loot 5 of those and take the watches you find inside back to Chromie. That will be the last thing you need to do in Andorhol, and you can sneak out of town whichever way you can find. If you're quitting, go south to Chillwind. If you're continuing, find a northern exit and move right into the next scene.
Scene 5 - Scarlet's Withering (level 57)
Quests completed: A Plague Upon Thee 2, Unfinished Business 1-2, The Mark of the Lightbringer, The Wildlife Suffers Too 1-2, Target: Gahrron's Withering, Gahrron's Withering Cauldron, Return to Chillwind Camp 4
There is a path to the east of Dalson's Tears that leads north to the Scarlet Crusade's base of operations. Head that way, and kill Diseased Wolves along the way. You don't want to head into the mountain pass just yet, though. Instead, veer off to the left and you should reach the Northridge Lumber Camp. You've got a whole jar full of termites that are waiting to meet the lumber camp. Release them on the crate in the back. (Make sure you click the jar once you place it.)
Leave north and look for a small trail that leads down into a valley. At the end of it, you will find Kirsta Deepshadow, who has a mission for you. Ride back to the base of the path where the forces of the Scarlets have their camps, and look for the appropriate mobs to kill. (Note: invokers hurt.)
Return to Kirsta for part 2. You'll actually need to get up the path a bit for this...and feel free to hop the eastern wall and skip some of it if you can find a way over. The path has a small split to the east where Huntsman Radley hangs out. He's the easy one.
Further up the path to Hearthglen is a guard tower. This is where Cavalier Durgen is, and it's also the site of another quest objective. So carefully fight your way inside. With any luck, someone else might have cleared it for you since it's nearly the only source of a rare enchant, (or used to be anyway,) but working your way into the tower alone is not a ton of fun. Be careful. The Cavalier is usually at the top, right next to the chest that is holding the relic of Uther.
When you can free yourself of that guard tower, ride back out and around to the lumber mill so you can complete the quest with Kirsta. Do not bother with the follow-up. Instead, return to the zone's main road and hunt down enough Diseased Wolves to finish The Wildlife Suffers Too. Head back to the Writhing Haunt, approach from the northeast, and slip into the house as best as you're able. Oh joy, a follow-up. We get to come back a third time.
Leave to the northeast and go to Gahrron's Withering. This is the site of the fourth cauldron, and the "other" quest in the area is actually a follow-up to a quest we didn't do. So just get to the cauldron and get out. For some classes, this one's actually much easier than The Writhing Haunt. Once you've finished, stalk the area for bears. Return to the Tauren at the Haunt when you're finished, and finally go back to Chillwind Camp.
Scene 6 - The Tomb Escort (level 57)
Quest completed: Tomb of the Lightbringer
Real simple: Accept the escort quest from Anchorite Truuen, and follow down the road. You'll be ambushed twice. Once by the cemetery gates by three upper-level targets, and once halfway into it by four level 53 zombies. With his assistance, this shouldn't be anything you can't handle at 57. Just make sure he isn't getting beat up.
Fly to LHC afterwards.
Scene 7 - Plagued Hearts (level 57/58)
Quests completed: Of Lost Honor, Villains of Darrowshire, Hameya's Plea, Of Love and Family, They Call Me The Rooster
Travel north to, well, Northdale. Don't fight the mobs on the surface; they're horrible. Instead, just dive into the water. Annoyingly, the water elementals fear you OUT of the water. However, your only reason for being hear is to grab an object from the center of the main body of water.
After that, head northwest toward Quel'lithien Lodge. We've been holding onto the four fragments from Troubled Spirits of Kel'theril. Turn it in finally.
The next task is optional and only if you're level 58. Head back east to Zul'Mashar. The mossflayer trolls in the area don't take kindly to outsiders and don't understand you're doing them a favor. Fight your way into their home, being careful with the scouts -- stun them off the bat if you can. In the center of Zul'Mashar is a group of undead trolls, and among them should be Infiltrator Hameya. In his last words written to you, Hameya asked you to kill him for the good of his tribe. If you've gotten this far, answer his plea. He moves around, so it shouldn't be hard to get a clean pull.
Travel southward to Blackwood Lake. In the center of the lake is Horgus's Skull. Snag it, and continue to The Infectis Scar. In the northeast portions of the chasms is the Shattered Sword of Marduk. Grab that too and ride out. The only exit is at the west end, which is the direction you're going anyway.
Head to Fordring to finish Of Lost Honor and get a follow-up. Then go south. If you killed Hameya, take a detour to the Undercroft to complete that quest. Either way, find a path out to the lake and ride around the outside of it until you get to the bridge to Caer Darrow. Cross the bridge, and veer left. Artist Renfrow is in a small shack on the western side of the isle. After talking to her, hearth back to Light's Hope Chapel to finish up.
Since you're leaving, turn in any scourgestones you've collected. Give one of your tokens to Dispatch Commander Metz for They Call Me The Rooster, and if you have enough bone fragments or whatever else to complete one of the other quests, by all means do so.
You Are Not Prepared
Even if you're level 58, I advise not pulling a duck-and-run to Hellfire Peninsula. Quite frankly, your gear sucks. You'll get your butt handed to you. You need the comfort factor an extra level will get you before HFP will be nothing but frustration. SOME classes can do just fine at 58 regardless. (Hunters, most casters.) Other classes flat-out die. Painfully.
|
